Sometimes you will take a photo with your camera and it will look nice and sharp with vibrant colours. Other times it will look muddy and grainy. There is a good chance this is being caused by image noise.
Wikipedia defies image noise as:
“Image noise is random variation of brightness or color information in images, and is usually an aspect of electronic noise. It can be produced by the sensor and circuitry of a scanner or digital camera. Image noise can also originate in film grain and in the unavoidable shot noise of an ideal photon detector. Image noise is an undesirable by-product of image capture that obscures the desired information”
The science behind Image Noise and the various types of noise is quite complicated so I don’t want to discuss it here. I just want to look at how you get image noise in photography and what you can do about it.
What Gives us Noise?
On digital cameras image noise is incurred from long shutter speeds and/or high ISO settings. Thus, it is going to occur in low light situations more than in well lit conditions. The biggest culprit of these two is probably high ISO.
You are only going to incur significant image noise from very long shutter speeds. However, if you are using shutter speeds this long, it is probably for a specific purpose such as night photography, in which case the long exposure time is really unavoidable.
However, the ISO is likely to increase in lower light situations quite often, especially if you aren’t using a tripod or flash. ISO determines the camera sensor’s sensitivity to light. The higher the ISO value the more sensitive it is to the light which falls on it. This gives faster exposure times but also adds noise into the image. A good example of this is taking snapshots indoors. The light is low, your camera is handheld and you aren’t using a flash, so the camera will require a high ISO to give an acceptably fast shutter speed to stop motion blur. The resultant image looks grainy and lacking fine detail.
Because of this, image noise incurred from high ISO settings is more common so I want to focus on this.
Effects of ISO
To illustrate the effects of higher ISO I have taken a series of pictures at different ISO settings. The images are at 100% size. Click each image to see it at full size.


The four photos above show the damage noise can do to an image.
- The first image, shot at ISO 100, has no noise and is sharp and clean.
- At ISO 400 there is a little noise evident and there is some minor deterioration to the image but only on close inspection.
- At ISO 3200 the noise is very evident and there is significant deterioration to the image quality.
- At ISO 51200 the image has become a mass of noise. Little or no fine detail even remains.
Minimising Noise
As higher ISO’s produce more image noise, the way to minimise noise it to keep the ISO low. Manually setting your camera’s ISO setting to a low value will certainly reduce noise but it will also slow the shutter speed down.
- Stabilise the Camera. It may be a case that by reducing the ISO, it provides a shutter speed that is too slow for the image to be taken handheld without incurring camera shake or motion blur. In which case you can use a tripod or suchlike to stabilise your camera. This is fine for static objects but may not solve the problem with moving objects as they will likely blur from the slow shutter speed even if the camera is totally static.
- Open the Aperture. Another option to combat the slow shutter speed from a low ISO is to open up the aperture. A wider aperture lets more light through the lens and will reduce exposure time. How wide the aperture will go depends on your lens but remember that wider apertures give reduced depth of field which may not be desirable.
- Let there be Light. The last option is to provide additional light. This can be from a flash, strobe or any other light source. The more light you provide, the quicker the shutter speed you can get. However, providing this light may not be possible because, for example, it is a wide open space. And also, the effects of this lighting on the image may not be what you desire. e.g. a person illuminated with a flash gun can often look unnatural compared to one lit with environmental light sources.
Although these methods can help to keep the ISO, and the resultant noise, low, they may not desirable to use. As such, there will still be many circumstances where you have to put the ISO up. So let’s now look at what can be done to reduce noise after the image is taken.
Reducing the Noise
As they say, ‘prevention is better than cure’ and that is very applicable to image noise. Because image noise effectively destroys the detail within an image, there is no way of fully reclaiming it. Although most post-processing software will have noise reduction features they can never come close to giving the level of detail which would be captured without the noise being present in the first place.
Taking the images from above, I have applied Noise Reduction (NR) using Lightroom’s Noise reduction feature.
The first series of photos shows the image at taken at ISO 3200 (which had significant noise). It then shows the image with NR applied. The slider was set to 50 which reduced most of the visible noise The last image is the photo taken at ISO 100. Notice the significant difference between that and the image with NR applied. The image at ISO 100 has far more fine detail and sharpness.


The second series of images shows the image at ISO 51200, then the same image with NR applied. NR had to be set to 89 to get rid of the noise. The last one shows the image at ISO 100 to compare it. Even with heavy noise reduction applied the image still looks messy and there is no fine detail.


As the above images show, noise reduction can never bring the image close to how it would have looked without the noise being initially present.
If you have a noisy image, how much NR you apply is entirely up to your preference. Taking the noisy image at ISO 51200 I show below the effects of various levels of NR in Lightroom.


Shrink Me Down
Another way to combat noise in an image is to shrink the image down. When you reduce the size of the image, it can have the effect of making it appear less noisy. Although this can be handy if displaying it on a platform like Instagram, which only displays small images, when viewing it on large displays or printing out in large format, the image size reduction will also result in a noticeable degradation of the image quality.
However, I will show this effect with the images below. The previous examples showed only part of the image at 100% scale. The next example shows the entire image but scaled down to 20%.


This shows that the noise now doesn’t become significantly evident until the image shot at ISO 51200. However, there is a reduction in overall image quality anyway due to the reduction in size.
Noise from Post-Processing
We have looked at how you get noise from the ISO setting of your camera when shooting the image. However, unwelcome noise can also occur during post-processing. Significant changes to the exposure of the image i.e. making it darker or lighter will attract noise. So tools such as exposure, brightness, contrast, clarity etc which all alter the exposure in the image will add noise. That is why it is best to get a good exposure when taking the shot rather than relying on post-processing software afterwards.
The images below are at 100%. The first one has a little noise but when I increase the exposure. a lot of noise becomes evident.


Noise for artistic effect
Although noise is generally seen as undesirable because it degrades the quality of the image. Leaving the noise present, or even adding noise in post-processing, can be an interesting artistic effect. Noise is quite easy to add to an image and most post-processing software will have a function to do this. However, as shown above noise is impossible to remove from an image without significant degradation. As such, if you want to add noise to an image, it may be best doing it at the post-processing stage.
Usually post-processing software will have the option to ‘add noise’. However, there may be options such as ‘add grain’ or ‘add film grain’ which will also add noise but mimicking the grain which was evident using high ISO film in film cameras.
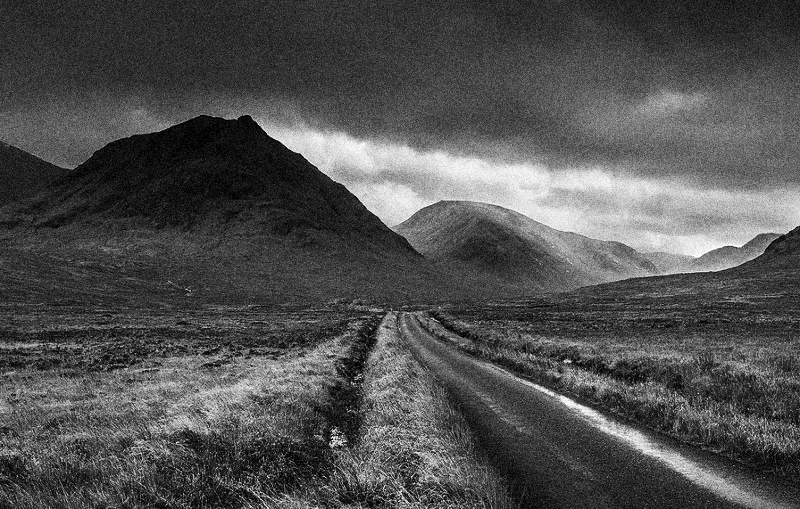
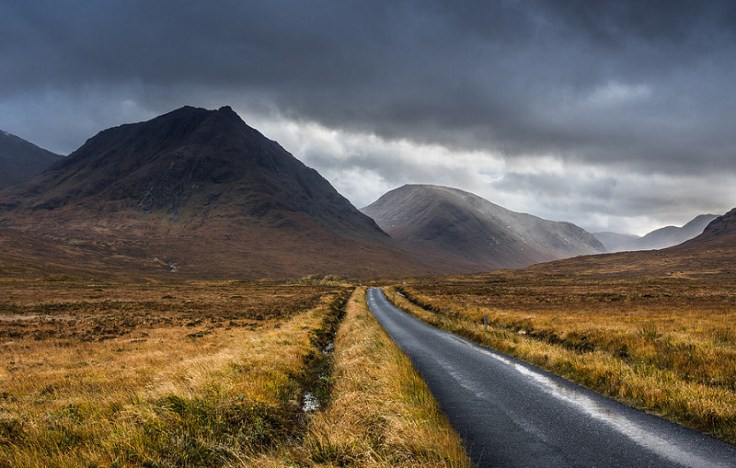
Noisy images tend to lend themselves to moody, dramatic scenes rather than bright, cheerful ones. Here is an example below. This was shot at Glen Etive in Scotland on a stormy day. It was shot at ISO 100 and even after post-processing there was little noise evident. However, I have reprocessed the photo and added significant noise using Photoshop. I think it kinda lends itself to a dark, moody picture like this.


A Little Bit of This, A Little Bit of That
When you have a noisy image all is not lost. Although you can never get the level of fine detail you would from a noiseless image you can still apply some or all of the measures above to get something decent.
The image below was shot handheld in very low light. It required ISO 6400 to get a decent shutter speed and the image had a lot of noise. During post-processing I applied a little bit of NR but also left some noise in the image as the effect was not too unpleasant. I also reduced the size of the image slightly to further reduce noise but not so much as to impact on the overall image quality too significantly.


The on the left is a scaled down version of the final image for the blog. But on the right is a 100% crop. Using some NR, leaving some noise in place and resizing the image has produced a decent result considering how noisy the initial capture was.
Conclusion
I hope you have been able to learn something from this post about image noise in digital photography, how it is created and what can be done with it. Although it is generally seen as undesirable, steps can be taken to reduce its impact or even turn it into an artistic effect in itself.
Thanks for Reading,
Neil


Hey, im perhaps oversimplifying, but would you say the best way to achieve the least noise would be to set the camera to the lowest ISO (usually 100) and if shutter speeds drop, just whip out the tripod and deal with it?
LikeLike
Yup, that pretty much sums it up. But if you dont have a tripod or you need to shoot quickly before you can get the tripod set up, you will need to do something to get the shutter speed up. You can up the ISO and attract more noise, or open up the aperture and reduce the depth of field, or maybe a bit of both.
LikeLike