
Many people recommend not shooting with your camera in full automatic mode and suggest instead using manual mode. So today I want to look at the differences between manual and automatic modes on a standard DSLR and what are the benefits or disadvantages of using them.
What are all those settings?
Before even thinking about switching your camera off of automatic mode you really need an understanding of the main settings on the camera and how they alter your photo. So I will give a brief, non-technical run down of them.
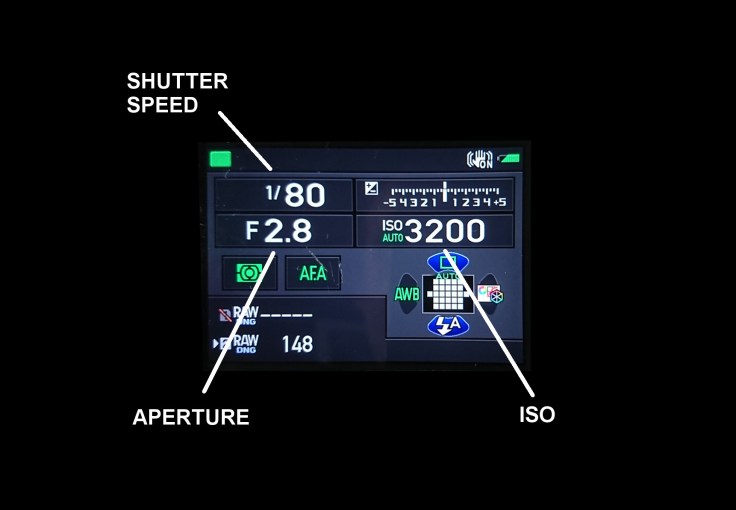
Shutter Speed – The duration the shutter opens for, letting light through onto the sensor or film. It is rated in seconds i.e. this displays shows an exposure time of 1/80 of a second. Longer exposures cause blur in movement whether that be of the subject you are shooting or blur from the camera moving, if shooting handheld.
Aperture – The aperture is the hole at the end of the lens that lets light through from the lens to the shutter. This can be wider or narrower depending on the value. The higher the f-number, the narrower the aperture.
Smaller apertures (higher f-number) let through less light, so longer is needed for the photo to expose. Smaller apertures give greater depth of field than wider ones (lower f-number)


The above example shows the effect of the aperture on depth of field and exposure time. Click the text caption below each photo for more info.
ISO – This determines the camera sensor’s / film’s sensitivity to light. The higher the ISO value the more sensitive it is to the light which falls on it. This gives faster exposure times but also adds noise into the image.


All these settings interact with each other to determine the exposure of the photograph and having a knowledge of how they work is important if you want to turn your camera off automatic.
Understanding the Interaction
Before considering using a semi-automatic mode or manual mode you must not only understand what the above settings do, but also how they interact with each other.
All these settings either increase or decrease the exposure of the final image. Thus, if you adjust one setting either you, or the camera, will have to adjust the others to compensate and get the correct exposure.
E.g. If you use a small aperture (high f/stop) to increase the depth of field this will cause less light to enter the camera. This means to get the same exposure you would have to have a slower shutter speed or a higher ISO, or both. The increased shutter speed would let more light in to compensate for the smaller aperture. The higher ISO would mean that the sensor was more sensitive to light and would require less light to produce the same exposure.
Thus, to ensure a good exposure all these settings, and how they affect each other, have to be considered together.
What is Automatic and what is Manual?
Fully automatic mode on a camera takes control of all these settings above. The camera determines the optimal settings for each of them meaning you just have to point and shoot and it will take care of the rest.
A semi-automatic mode is where you manually set either aperture, shutter speed and ISO (or two out of these three) and then he camera sets the other(s). e.g. you set the aperture manually, then the camera determines the ISO and shutter speed.
Full manual mode is where you manually set the ISO, aperture and shutter speed.
Exposure Compensation
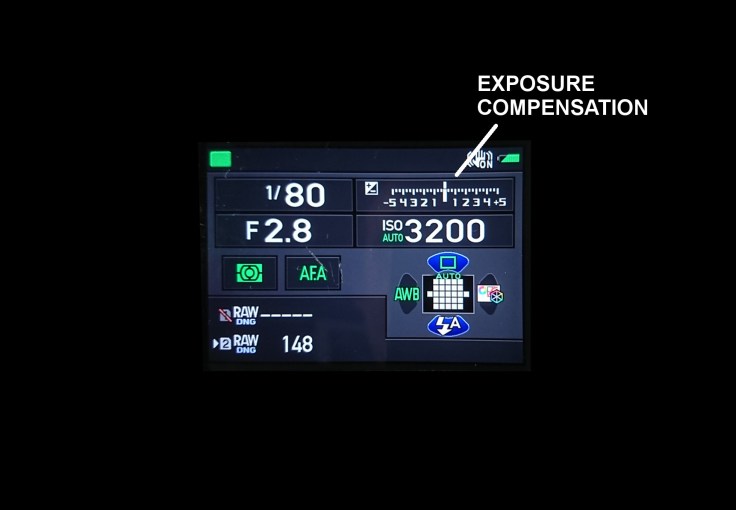
I want to quickly mention this feature. It is available in the semi-automatic modes and allows you to alter the exposure of the final image. When it is set in the middle, the image will be exposed in the optimal way as determined by your camera’s light meter. Moving this slider to the left will produce a darker exposure requiring less light, moving it to the right will produce a lighter exposure requiring more light. This is an essential feature when shooting in these modes as it is used to compensate for exposure issues from the cameras light metering system. Many cameras have this feature available in automatic mode as well.


Why not just shoot automatic?
In the perfect world, the camera’s automatic mode would second guess the exact settings you need and adjust them accordingly. However, that is certainly not the case in reality. The conditions you are shooting in and the way you want the photo to appear cannot be guessed by the camera. When a camera’s automatic mode adjusts these settings it does so to give you an ‘acceptably’ exposed photo. How it does this depends on the programing in the camera.
From a quick play around with my camera to take a shot of Bender on my cabinet, the fully automatic mode seeks a minimum shutter speed of 1/100 and opens up the aperture, then increases the ISO to achieve this. For me 1/100 is probably a quicker shutter speed than necessary for a shot of a static object. Because of this, I now have a far higher ISO than I want and a lot of unnecessary noise. In addition, the highlights are slightly blown out as I feel the exposure was too much.
I then shot this in a semi-automatic mode. I set the aperture to the minimum and then set the ISO to 3200 which gave me a shutter speed of 1/25 which was enough to get a sharp image but now i didn’t have as much noise. I also reduced the exposure to curtail the highlights.


Here are the two photos. Click on the floating text below each one for more info.
So from this example you can easily see the problem with automatic mode. You simply don’t get enough control of the final image. This can lead to your image having a poor exposure, the wrong depth of field and an unsatisfactory amount of noise. Thus, if you want to maximise the quality of your image, and tailor it your preferences you will need to switch to semi-automatic or manual modes.
Which settings do I choose to Control?
Although different cameras will have different shooting modes depending on the model, most cameras will have these standarised modes which are usually accessed by the wheel on top of your camera. Which one is best depends on what your are shooting but I will try and give some examples of where they are useful.
The first four listed are all the semi-automatic or ‘priority’ modes.
Av – Aperture Priority – The aperture is set manually. The camera then calculates and sets the shutter speed and ISO. On my camera, the ISO can also be set manually in this mode. This mode is useful where you want to have control over the depth of field in an image such as landscapes or macro.
Tv – Shutter Priority – The shutter speed is set manually. The camera then calculates and sets the aperture and ISO. On my camera, the ISO can also be set manually in this mode. This mode is useful where you want to have control over the shutter speed e.g. shooting something fast moving and you need a quick shutter speed such as wildlife or sports photography.
Sv – Sensitivity Priority – The ISO is set manually. The camera then calculates and sets the aperture and shutter speed. Useful if you require control over the amount of noise in an image. For example if you wanted to deliberately add noise for artistic effect. Honestly, this mode isn’t very useful because all the other modes (at least on my camera) let you set the ISO manually anyway if you want. Moreover, post processing software easily lets you add noise to an image afterwards if that’s what you want.
TAv – Aperture and Shutter Priority – The aperture and shutter speed are set manually. The camera then calculates and sets the ISO. Useful for where you want control over the shutter speed and depth of field but noise is not an issue. This again is handy for fast moving objects but where you need a set depth of field such as close ups of flying birds where you want to have a fast enough shutter speed to freeze it’s motion but also enough depth of field to ensure the whole bird is in sharp focus.
M – Manual Mode – The shutter speed, aperture and ISO are all set manually. This mode gives you complete control over everything. This mode is useful where you have static lighting conditions such as in a studio shoot as the camera does not alter any of the settings so they can be fixed to get the same exposure every time. It is also required to use manual mode where you have lighting conditions that the cameras light meter cannot detect, such as using manual flashes or strobes which aren’t linked in to the cameras light metering system.
Although this mode gives you complete control and can be used well in most types of photography, it can be time consuming to alter all the settings to produce a suitable exposure and it is perhaps not suitable when you need to quickly take snapshots.
So these are the common semi-automatic and manual shooting modes found on most DSLR cameras. Which one is best really depends on what you are shooting. Manual mode is the most versatile but it is also the most time consuming to adjust the various settings.
What do I use?
I mostly shoot landscapes and for 99% of my shots I use Aperture Priority mode and have the ISO set manually as well. This just leaves the shutter speed to be set automatically by the camera. I find Manual mode to be unnecessarily time consuming for this type of work. In this mode I can get a suitable depth of field which I want in landscapes and also keep the ISO at minimum to minimise noise. The camera then works out the shutter speed. If the exposure is a bit off it can be quickly corrected using the exposure compensation setting.
Here is an example:
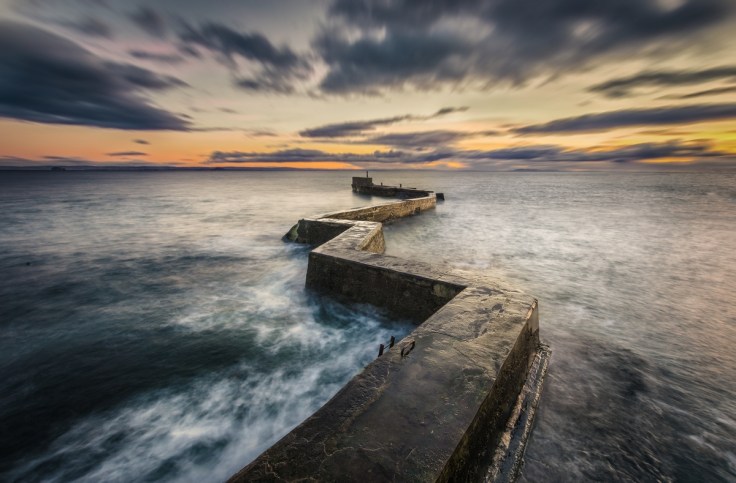
This was shot in aperture priority mode with manual ISO. I set the aperture to it’s smallest which was f/22 to maximise the depth of field and ensure the whole length of the pier was sharp. I set the ISO to 100 which is its lowest to ensure no noise was picked up on the final image. The camera then worked out the shutter speed of 4 seconds.
Although I could have done this in Manual mode it would have been far more time consuming and with the sun was setting I wanted to get the shot set up as quickly as possible. Moreover, the setting sun meant the light was constantly changing meaning I would have constantly needed to change the settings in manual mode to adjust for this. However, in aperture priority the cameras light metering system adjusted for this change and altered the shutter speed accordingly.
Conclusion
This has just been a brief overview of the various shooting modes and in time I hope to look at them individually in far more detail.
I hope in this post I have been able to demonstrate the limitations of using automatic mode and the advantages of using a semi-automatic or manual mode. However, I would not recommend using these other modes until you have at least a basic understanding of the settings on your camera and how they affect the image and it’s exposure. This is worth learning though as it unlocks more of the potential of your camera and allows you take take better quality images which are crafted to your artistic desires.
Thanks for Reading,
Neil


