In my previous post I discussed the benefits of switching your camera off of automatic mode and onto a semi-automatic or manual mode. Today, I want to have a more in depth look at the shooting mode which I use most – Aperture Priority.
Spin that Wheel
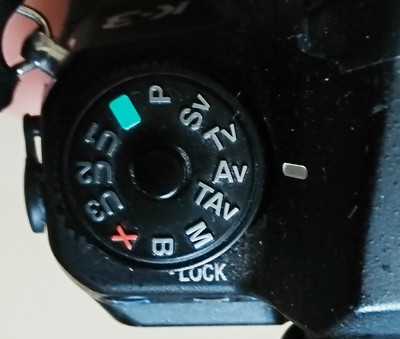
Aperture Priority is a shooting mode that is accessed using the wheel which is on the top of most DSLR cameras. Turn the wheel to select ‘Av’ which is the abbreviation for Aperture Priority Mode.
What do you Control?
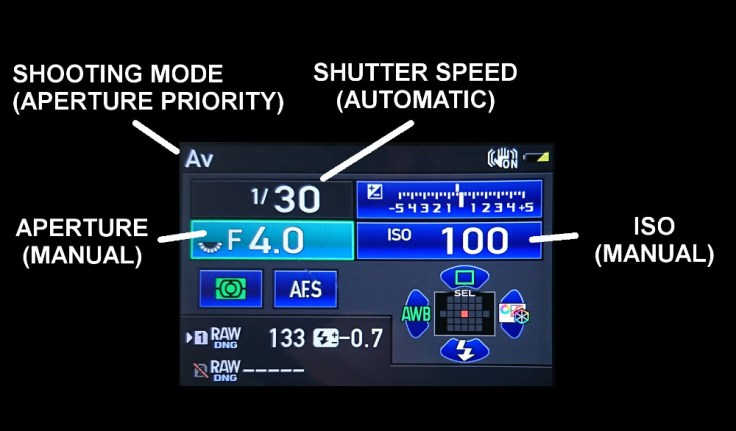
Aperture Priority (Av) is a semi-automatic shooting mode which means that some settings are set manually by the user and others are set automatically by the camera. In Aperture Priority mode the aperture is set manually and the shutter speed is calculated automatically using the camera’s light metering system. On my camera, the ISO can either be set manually or switched to automatic. I always have the ISO set to manual and would recommend anyone shooting in this mode to do the same. Thus, when I use this mode, I set both the aperture and ISO, leaving only the shutter speed to be calculated automatically. In this post I will assume the ISO is set manually.
Quick, Easy and Versatile
Av mode is probably the most accessible of the non-automatic shooting modes. One of the main reasons for this is because the shutter speed is set automatically. In shooting modes where the shutter is set manually, it can be fidgety and time consuming trying to get the correct shutter speed for the given shot and this can often result in photos being exposed wrongly by a considerable amount. And, depending on the camera, it can even result in situations where the camera refuses to shoot because the required exposure is just not possible at the set shutter speed.
When in Av mode, because the the shutter is set automatically, and due to the huge range of the shutter speed (my camera will go from 1/8000 sec to 30 sec in Av mode), the camera will nearly always find a suitable exposure immediately, regardless of what the aperture and ISO are set to.
Not only is this mode easily accessible, and it also highly versatile and can be used well in a wide variety of photography including landscapes, macro, portrait, or even just walkabout snapshooting.
As said, in Av mode you will have manual control over the aperture and ISO, so now lets have a look as the best settings for these.
What Aperture setting do you Choose?
This will depend on the subject you are shooting. For landscapes, I would not recommend shooting with an aperture value lower than f/8 to ensure you get a suitable depth of field. If you have prominent foreground objects close to the camera, you may have to go up to f/11 or higher to make sure everything is in focus. Some lenses will have a depth of field indicator which tell you how much will be in focus at a given aperture setting and focus distance. If not, it may be worth shooting at the hyperfocal point, which is a focusing distance which will give you the maximum depth of field for a specific aperture setting.

If you are shooting portraits or objects which you want to isolate from the background, you will want a low f/stop value to minimise depth of field and blur the background. However, it is worth bearing in mind, the longer the focal length and the closer you are to the subject, the less the depth of field becomes. When shooting portraits or objects of a similar scale, this is not much of a problem, and the lowest f/stop should work well.
However, when shooting macro it can become a considerable problem with depth of field often dropping to less than 1mm (yes, that’s millimetre). As such, for macro work you will probably want to set the aperture to it’s maximum f/stop value.
Here is a link to an excellent depth of field calculator which should be of help:
http://www.dofmaster.com/dofjs.html
What ISO setting do you Choose?
I recommend shooting with the ISO at it’s minimum value all the time, if possible. The higher the ISO setting, the more noise will be in your image. Although adding noise can be used as an artistic effect, you can easily add noise in post-processing software. Most software will have the option to add noise to an image and it will give you far more control over it, and better results, than just pushing the ISO up on your camera.
The same cannot be said about removing noise though. Granted, most post-processing software will have noise reduction features but these can never reduce noise without degradation to the image, usually resulting in loss of fine detail.
Therefore, try and keep your ISO as low as possible.
Watching the Shutter Speed
As I said, even with the aperture and ISO set manually, Av mode will usually find a suitable exposure. However, to do this it may require shutter speeds which aren’t suitable for the conditions. This problem mostly occurs in low light situations where you are using the camera handheld. To get the set aperture and ISO, the camera will automatically set a slow shutter speed which would result in motion blur from your hand shaking. Always be mindful of this when using Av mode, and quickly check the screen on your camera before taking a shot to see if the shutter speed is suitable. When shooting outdoors on bright days, this should not be an issue, but on dull days, and when indoors you must keep an eye on this.
As a quick guide to a suitable shutter speed when shooting static subjects handheld, using a shutter speed equal to, or greater than 1 / focal length of your lens will usually avoid too much motion blur from camera shake. i.e. if your focal length is 50mm, make sure your shutter speed is >=1/50 sec.

When shooting moving subjects, it will vary depending on the speed of movement. Because of this, Av mode is not the most suitable shooting mode for fast moving subjects.
Compensating for a Slow Shutter Speed
If you are shooting handheld, and don’t have access to a tripod, and find your shutter speed is too slow there are two ways you can rectify this and bring the shutter speed up. Because you manually have control over the aperture and ISO, you can alter either or both of these.
Altering the Aperture
If you require a faster shutter speed, you can shoot with a wider aperture i.e. reduce the f/stop value in the aperture setting. This will let more light through the lens decreasing the amount of time needed to get the right exposure. The widest aperture / lowest f/stop value you will get will vary depending on the lens you are using.
By doing this you can increase your shutter speed considerably but it will reduce the depth of field. This can be a problem in landscapes if you have prominent foreground elements close to the camera as you can end up with out of focus areas which can mar an otherwise good shot.
Altering the ISO
The other option is to increase the ISO. This increases the camera sensors sensitivity to light and thus it needs less time to get the exposure. Increasing the ISO will increase the noise in your image but if you want to retain the depth of field then you really don’t have any other options left. If shooting handheld in more extreme low light conditions, such as dark indoors, you will almost certainly have to up the ISO to get a suitable shutter speed as even setting the aperture to it’s lowest f/stop value will not be enough.
Shooting on the Move
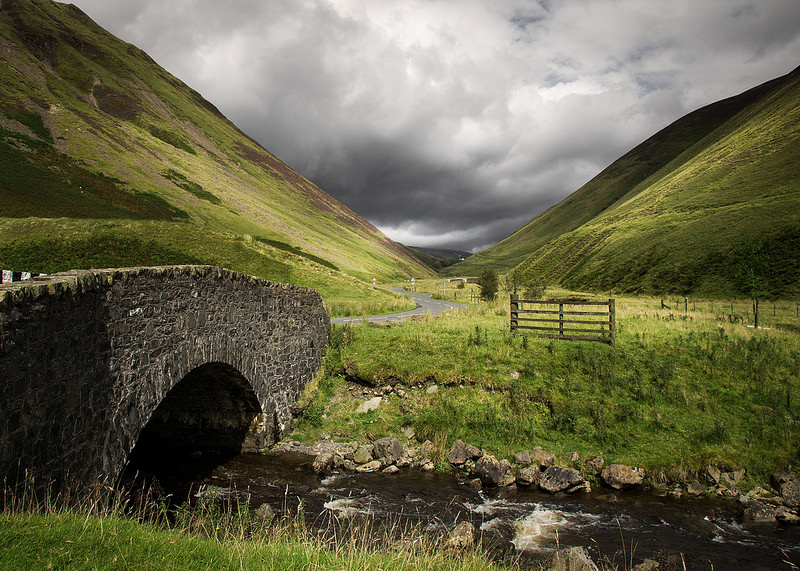
I mostly walkabout shooting landscapes and their various features. I use Av mode almost exclusively, so why is it such a good mode to use for this type of photography?
Av is a great mode for landscape photographers as it lets you control the depth of field and keep the ISO low whilst automatically adjusting the shutter speed to suit. It is also an excellent mode for ‘walkabout’ snap shooting because you can quickly flick the aperture to a suitable setting for your subject and the camera will deal with the rest.
This mode is quick and easily to set up and responds to changing lighting conditions instantaneously. When shooting outdoors the light appears even and constant but when taking photographs the angle you point the camera at in relation to the sun dramatically alters the exposure time of the shot. Even a few degrees difference in your position can make a considerable difference to the exposure. It is worth noting that although this mode adapts well to changing lighting conditions, it is not suitable where you have external lighting such as manual flashes or strobes which the camera’s light meter cannot detect. In such circumstances it will produce the wrong exposure.
How I Set Up
When I go out during the day, my initial setup is almost always Av mode, ISO set to 100 (which is the lowest), and aperture set to f/8 which gives a good amount of depth of field without increasing the shutter speed too much. I find this setup gives good results for most outdoor photos. If it is a very dull day or the sun is low on the horizon, I might reduce the f/stop slightly to quicken the shutter speed. However, I do not wish to reduce this too far as it will start giving out of focus areas, so I may to increase the ISO one step up to 200 which doesn’t add much noise. For most daytime weather conditions, I find this is the optimal setup for handheld landscape photography.
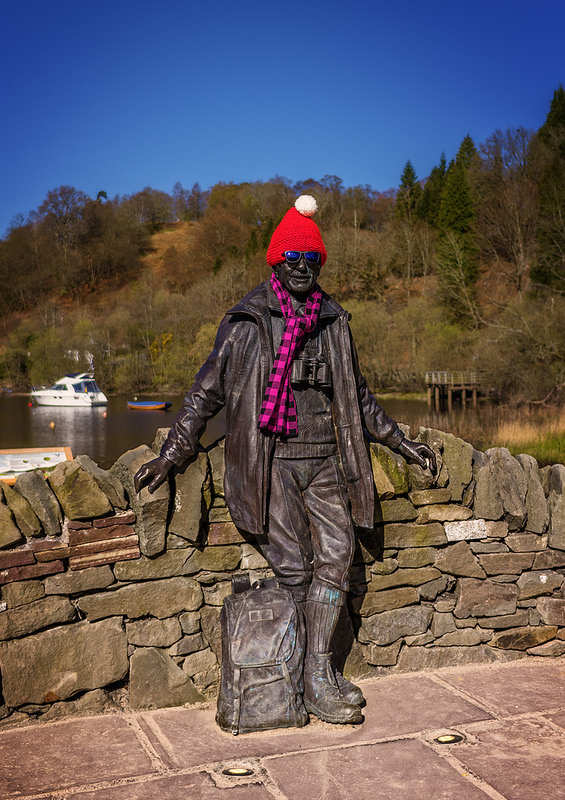
If I am shooting a specific object e.g. a statue, I can easily open up the aperture to help throw the background out of focus, then easily set it back again when I am finished.
Summary
Aperture Priority mode is a versatile shooting mode which can be used in a variety of different types of photography. It is quick to set-up and easily adapts to varying lighting conditions. So, if you have never used this mode before, I recommend giving it a go especially if you like walking around outdoors snapshooting. You will see it gives far more flexibility and better results than using automatic mode.
Below is a quick list of the pros and cons of this mode:
Advantages
- Quick to set up and get good exposures
- Can be used well in many different types of photography
- Easily and quickly adaptable between different types of photography e.g. switching from shooting a landscape to shooting a portrait
- Responds well to varying lighting conditions
- Provides suitable exposures in most conditions irrespective of the manual settings
Disadvantages
- Need to monitor the shutter speeds as these can become slow for the shooting conditions
- Not as suitable as other modes for fast moving subjects
- Does not work when there is external lighting which the cameras light meter cannot detect such as manual flashes or strobes
Thanks for Reading,
Neil


Leave a comment