In a previous post, I took an image of a churchyard with a washed out sky and added the sky from another photo into it. Today, I want to have a more in depth look at this process.
Why Replace the Sky?
Often when you take a photo you may have interesting subject matter but a not so interesting sky. Often you can end up with the sky being a flat block of colour which you may not want in your image. This can happen on sunny days, when the sky is a flat swathe of blue, or on cloudy days when it is flat and grey. It can also occur if the sky is overexposed to a sea of white.


It may also just be the case that the sky you captured in the initial photo is just not to your liking for whatever reason.
Although you can make alterations to the original sky in post-processing, the best option may be to replace the sky entirely with one from a different photo.
What Do You Need?
Photos
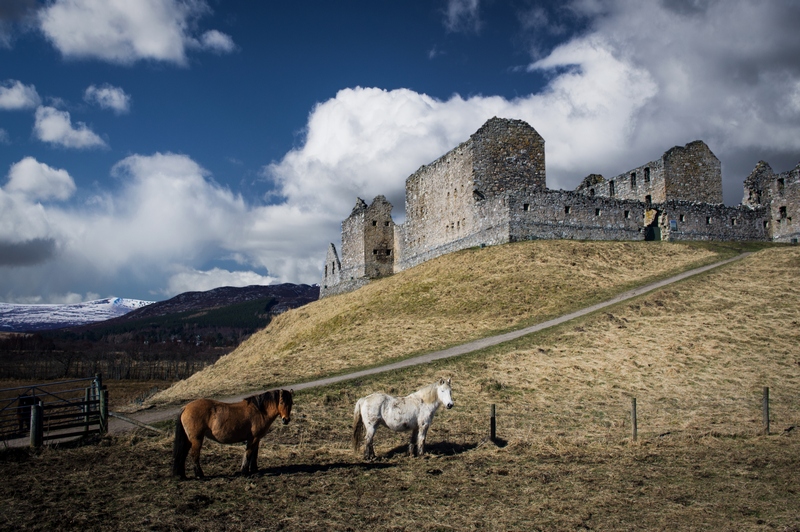
You will have your initial photo with the sky you wish to replace, such as the two shown above. You will also need another photo with the sky you wish to transplant in. The sky you wish to use is entirely up to your discretion however when choosing your sky there are some things to bear in mind if you want it to look realistic, which I will discuss below.
Software
You will also need image editing software that allows you to work with layers. In this tutorial, I will use Photoshop. You can however use other software such as G.I.M.P. which allows you to work with layers. The principles and workflow will be similar using these, but some of the commands may be different.
Software such as Lightroom is not suitable for doing this as it does not let you overlay multiple layers.
Choosing a Sky
More often than not you will want the final image to look as realistic as possible. When adding a new sky there is a danger that it can look totally out of place and make the entire image seem unrealistic and manipulated.
Here are a few tips to help ensure a realistic final image:
Use Similar Weather
If you want to maintain a realistic appearance, it is probably easiest to transplant skies that exhibit similar weather. E.g. If you have a sunny weather with a flat blue sky, try using a sky from another sunny day but with some cloud detail in it.
This not only ensure a continuity in the weather conditions of the initial photo, but also usually helps promote unity between the tones and colours of the two images stitched together.
Using the photo from above of the sunny day, I have stitched in a sky from another similar sunny day but with more cloud detail. The result looks realistic.


Using the photo of the cloudy day, I will transplant in a photo of another cloudy day with more cloud detail. Again, the result looks realistic.


I will now now switch them around and use the stormy sky in the sunny photo, and vice versa. The two results don’t look as realistic and look like they have been manipulated.


Although the two images above don’t look too bad, there is just something a bit off with them. Something in your brain registers that there is something unrealistic in them. This is due to the highlights and shadows not being conterminous with the detail of the sky.
However, I would still encourage you to play around with different weather types as you can often get a wonderful result. The example below shows a shot taken on a sunny day and a cloudy, misty sky was added.


This may not work in a lot of cases and may require significant amounts of post-processing work afterwards. So if you are struggling to make the image look realistic with a new sky, just use a sky with similar weather conditions.
Light Direction
As I mentioned above, images with a transplanted sky can look unrealistic if the highlight and shadow detail is not similar with that of the sky. Leading on from this, when adding a new sky, if you want a realistic final image you must be aware of the direction of the light.
In the majority landscape photos, the light will come from the sky, be that the sun or the moon. When stitching on a new sky you should try and add a sky with a similar light direction or again, it will look unrealistic.
Here is the above example with the stitched in sky. However, now I have flipped the sky horizontally. All of a sudden, something seems amiss and the sky looks stuck on and unreal. This is because the direction of light is different in the sky than in the foreground.

If you are unsure of the light direction in an image, you can often tell by looking at the highlight and shadow detail of objects. The areas with highlights are where the light source is hitting, the areas with shadows are where it isn’t. Thus you can gauge the location of the light source and its direction of travel from this.
Taking the above example I have marked on the direction the light is traveling. In the foreground section, the left walls of the ruin are highlighted and the horses are casting shadows to the right. Thus, the sun is likely to be about 90o to the left. I have marked this with green arrows.
The sky however has highlight details on the right of the clouds, and shadow detail on the left, so the sun is likely to be on the right. I have marked this with red arrows.
And this is why the image looks unrealistic.

Time of Day
If you want to have a realistic stitched sky it is also best to use a sky taken at a similar time of day.
It goes without saying that stitching a starry, night sky onto a photo taken at midday would look unrealistic. However, also adding a sky taken at a markedly different time during the day is also likely to look unrealistic. This is because the location of the light source (the sun) changes and alters how shadows are cast.
At sunrise and sunset the sun is low on the horizon and casts long shadows. It also uplights clouds in the sky leaving the shadow areas in the clouds at the top of them. The light is also softer and less intense. Moreover, it has a more orange tint to it.
During the day, the light becomes more intense and harsher and the shadows it casts gets shorter. Its also downlights clouds giving them shadow areas on the bottom. It also produces a whiter light.
Here is the same photo with a sunset sky added. It looks totally unrealistic. Eventhough the light is coming from correct direction, the left, it is far too low in the sky compared to the light source that is lighting the foreground. The shadows look wrong because of this. The shadows from the horses are too short for a low sun and the shadow areas in the ruins are too light, which suggests a greater ambient light which comes from a bright sun nearer midday. In addition, the colours are wrong. The sunset sky would bathe the scene in an orange light however this is not reflected in the foreground colours.

Reflections
Always be mindful of reflections when adding a new sky. Water, glass, metal, and any other reflective objects may be reflecting the sky. In which case, any new sky will also have to show up in the reflections.

This photo of Eilean Donan Castle looks great apart from the flat, boring sky. Thus, I transplanted a new sky into it. However, the photo shows strong reflections being cast into the water. Thus, any new sky would have to be mirrored in the water reflections to make it look believable.

The same photo with a more interesting sky added (amongst other alterations). After stitching on the new sky I then had to add another copy of the sky as a new layer but this time flipped vertically. I then had to blend it into the water to create the reflection of the sky.
These pointers will hopefully help you choose a suitable sky to stitch into your image which will give it a realistic appearance. Now I will look in detail at how to do this process in Photoshop (PS).
How to add a new sky in Photoshop
Firstly, you need to pick your two images to use. I will use the picture of the ruined barracks from above and the sunny sky with the large fluffy clouds.
If you want to try this tutorial with these images, the full size files can be downloaded with these links: Full-size Ruins Image , Full-size Sky Image
Import these into PS as separate images.


Select the Sky
Now you have to select the area of sky to be replaced. On the image which you wish to add the sky, make a selection of the sky.
PS has umpteen tools for making selections. For this one, I will use the Quick Selection Tool. This allows you to loosely select an area by filling it in and then PS detects nearby edges and fits the selection around these. This works well when you have a large flat area and well defined edges. I use the tool in the sky area to select it. Once it is done, the selection shows up as marching ants.


Some more complex objects such as tree branches on a tree can be very difficult to select. When making these selections you may wish to use other selection tools such as colour select, or the pen tool. As I said, PS has so many different ways of making selections and you will have to find the most appropriate method for the image you are using. Another option is just not to include them in the selection and let the new sky cover over them.
Check and refine the Selection
When using the Quick Selection Tool it can often not select the edges correctly. So I recommend zooming into the image and checking the edges of the selection and making any adjustments.
Looking over the image I have found a few problems such as the one below.

These are easily corrected using the lasso tools to add and subtract from the current selection.

Add a Feather
Next, add a small feather to the selection. This helps soften the edges between the selections. I would recommend adding a 2 or 3 pixel feather. With some of the selection tools you can add a feather as you select. If not, it can be accessed from Select->Modify->Feather.
Expand the Selection
Next, expand the selection to cover the area of the feather. As the feather softens the edges between the selections, it can leave a slight halo. Thus by expanding the selection by the same number of pixels as the feather, this should be eliminated. Select->Modify->Expand
Save the Selection to a Channel
Next, you want to save the selection to a channel so it can be accessed later. Select->Save Selection. Enter the details in the dialogue box as shown below. The ‘document’ is the name of the current image you are working with.

The selection now shows up under the channels tab as a black and white image which can be used as a layer mask later.

Lastly, we need to remove the marching ants selection. Select->Deselect. Don’t worry, the selection is now saved in a channel. If the deselection isn’t done, it causes problems when importing the new sky as a layer.
Select the new Sky
Switch to the image which contains the new sky. Make a selection of the area of sky you wish to transplant. I would recommend just using the Rectangular Marquee Tool to do this as it doesn’t have to be hugely accurate. The selection will be shown with marching ants.


Cut out the Sky
Now you need to cut out the sky and make it a new layer. Right Click within the sky selection and select ‘Layer via copy’.

The area of sky will now appear as a new layer under the layers tab.

Import the Sky into the Original Image
To do this, right click on the sky layer (which is called Layer 1 here) under the Layers tab. A long list of options comes up. Select ‘Duplicate Layer’

In the dialogue box, change the Destination ‘Document’ to the filename of the image you wish to import the sky layer into. In this case, IMGP4471.DNG. You can also rename the layer to anything you want. I will just leave it as Layer 1

Now switch back to the original image and the area of sky will now be added to the photo as a new layer.


Resize and Move the Sky
Next, you want to resize the sky and position it where you want it. Make sure you have the sky layer (Layer 1 in this case) selected under the layers tab then click the Move tool.

A bounding box will appear around the sky which will allow you to move and resize it using the handles. It may help to reduce the opacity of this layer to about 50% so you can see the underlying layer.

Resize and move the sky so it is in a suitable position, covering the sky area you wish to replace. Remember and turn the layer opacity back up to 100% if you altered it. Now click the tick at top to confirm the changes to the layer.

Adding the Layer Mask
Now we just need to tell PS which parts of the sky to show. Remember the selection we made right at the start, this is what we use.
Click the channels tab and you will see the ‘sky’ channel at the bottom.
Hold down Ctrl on the keyboard and click on the ‘sky’ channel shown above. A series of marching ants will now appear over the image showing the selection.

Now click back on the layers tab and make sure the sky layer (Layer 1) is still selected. Next click the create ‘Add layer mask’ button at the bottom, shown circled in red on the image below.

This adds the selection as a Layer Mask to the sky layer. Remember with layer masks, white reveals and black conceals, so now only the part of the sky that we selected right at the start shows through.

That is now the sky stitched into place. The last thing to do is to just check over the edges to make sure they look ok. If not, you can now alter the layer mask in a few different ways.
Altering the Layer Mask
Firstly, select the mask by clicking on it as shown below. It gets a white box around it.

To do general changes to the Layer Mask you can use Select->Select and Mask. This brings up a dialogue box which allows you to alter the mask in many ways.

Another way is to manually paint onto the mask. Select the brush tool and the select either white or black from the colour palette. You can then you can paint directly onto the image to hide or reveal parts of that layer.

Painting white lets the current layer come through, painting black hides it. Although you are painting onto the image itself, because the layer mask is selected, it will only alter this.
Finishing Touches
That is the sky stitched into place and all the edges refined. Now you have two separate layers which can be altered independently of each other if you so require it. Here are a few things you might want to consider when making the final changes to your image:
Exposure Balance – The exposure of the sky may seem incongruous with that of the foreground. Try adjusting them to make them more in harmony with each other.
Contrast Balance – The contrast levels of the sky may seem incongruous with that of the foreground. Try adding or reducing contrast as appropriate.
Colour Balance – The colours of the sky are incongruous with those in the foreground. Try altering the colour balances to bring them more in line with each other.
And here is the final image with a few tweaks. I have added contrast to the image. Pushed the highlights in the sky slightly. Moved the foreground colours towards blue, and added a slight vignette.

I hope this tutorial has been helpful in showing how to add new skies to images. Although this tutorial was quite long, once you get the hang of it, it can be done quite quickly.
In addition, the techniques and theory applied here can be used for many other objects other than skies. You may want to stick a super moon into a dreary night sky, or add a few horses wandering through a landscape. Your imagination is your only limitation.
Thanks for Reading,
Neil


Thanks for another helpful tuition. I need to try this in GIMP.
LikeLiked by 1 person
Thanks. The process in GIMP is almost identical so most of the steps in this tutorial should be relevant.
LikeLike
Great. Thanks. There are so many occasions when I’ve found a great composition but the sky has let the image down.
LikeLike